
Week 3
Connecting the model to the Arduino
In this lesson, students:
- assemble a wiring diagram for an astrosocks
- connect the astrosocks to the board
- write a program to display data
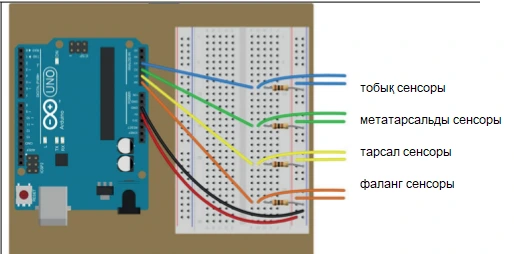
You can proceed from the level of listeners and suggest connecting sensors to the board without a ready-made template
Sensors are connected according to the principle of a simple button or touch sensor:
- one electrode directly to positive (5V)
- the second electrode directly to the analog port
- a 10K resistor is also connected to the second electrode
- the second electrode of the resistor is connected to minus (GND)
Also, depending on the level of students, you can try to write a program to display data from sensors
You must use a port monitor to output data
void setup() {

 pinMode(A0, INPUT);

 pinMode(A1, INPUT);

 pinMode(A2, INPUT);

 pinMode(A3, INPUT);

 Serial.begin(9600);

}

void loop() {

  int lodyzh = analogRead(A0);

  int predP = analogRead(A0);

  int plys= analogRead(A0);

  int falan = analogRead(A0);

    Serial.print(lodyzh);

    Serial.print(" ");

    Serial.print(predP);

    Serial.print(" ");

    Serial.print(plys);

    Serial.print(" ");

    Serial.println(falan);

    delay(100);

}