
Lesson 1
Teacher’s Guide
– Divide the students into groups;
– Familiarize students with the topic of the lesson (5-10 minutes for introduction);
– In the first week, you need to draw a house plan on paper;
– In the second week, you need to simulate a 3D model of this house;
– In the third week, you need to project a 3D model on paper using AR;
– Pay attention to the tasks at home;
– To evaluate the project, in the first week, provide this material (PBL rubrics) to students in order to:
– the students previously understood by what criteria they needed to prepare,
– the students were able to independently give an appropriate assessment to their colleagues.
Project objectives
– Learn how to design a house plan;
– Simulate a house in 3D;
– Get acquainted with AR technology and apply it on the project at home.
Introduction
Many of us would like to have our own house, and it’s good when it’s not just to buy a ready-made structure, but to create a house of our dreams, which will have all the wishes regarding layout and design.
Creating a house project is a rather complicated process. Specialists should fully describe all upcoming work in strict sequence. The preliminary design includes an image of the future structure from all sides and in the section, the formation of a list of materials and their quantity, the type of roof and wall thickness, the plan of all communications with the calculation of loads, etc. Architects take into account all the nuances to avoid errors at the construction stage.
The creation of a house project takes place in several stages. And the architectural part is working on creating a layout plan for all rooms, indicating the size and location of doors and windows, the thickness of the walls and the shape of the roof. In the constructive part, details of all elements of the structure such as the foundation, chimney, load-bearing walls, partitions, etc. are painted. In the engineering part of planning, a plan is formed for the organization of ventilation, water supply systems, sewerage, electricity. In the design part, the colors used for finishing are selected, decorative elements are considered, a plan is drawn up for the arrangement of furniture and appliances for a comfortable life.
The practical part
Even if creating a complete house project is a very complex process and requires professional knowledge and skills, in this lesson we will be able to cope with the layout of the house and draw a plan.
First of all, think about your home in general. Make a list of rooms that you would like in your house. For example, living room, bedroom, kitchen, hallway, bathroom, nursery. Decide whether you need this or that room, garage or terrace. Decide on the size and location of the rooms. You can use the tips below and make sketches on paper.
Living room. In many cases, this is the largest room. The area of the living room depends on the number of people living. A fireplace is usually installed here, a large TV and a panoramic window on a beautiful part of the plot or an exit to the terrace will look beautiful. The doors from the bedrooms, toilet and bath should not go into the living room.
Bedroom. The area of the bedrooms should not be very large and not very small. And the number of bedrooms depends on the composition of the family. For example, one for parents, for boys and girls in a separate room. It is better to make Windows facing the courtyard, and not on the road or fence.
Kitchen. The location of the kitchen should be convenient for moving between the dining area or living room. In modern homes, kitchens are combined with a hall or living room, but they should be zoned with decorative partitions or at least different types of finishes. The area and kitchen furniture should be convenient for everyday cooking.
Bathroom. The toilet and bathroom can be made separately or combined, this is everyone’s choice. The location is better if it is closer to the bedrooms. We advise you not to make an exit to the living room or kitchen. Here natural light is not so important, so we will leave the sunny side to other rooms, and here the windows can go to the shady side of the plot.
Entrance hall and corridor. You need to leave places for two people to pass freely. You can make all the doors go out into the corridor, but the doors should not interfere with the passage or each other when opening. For interior doors, we leave the piers one meter long.
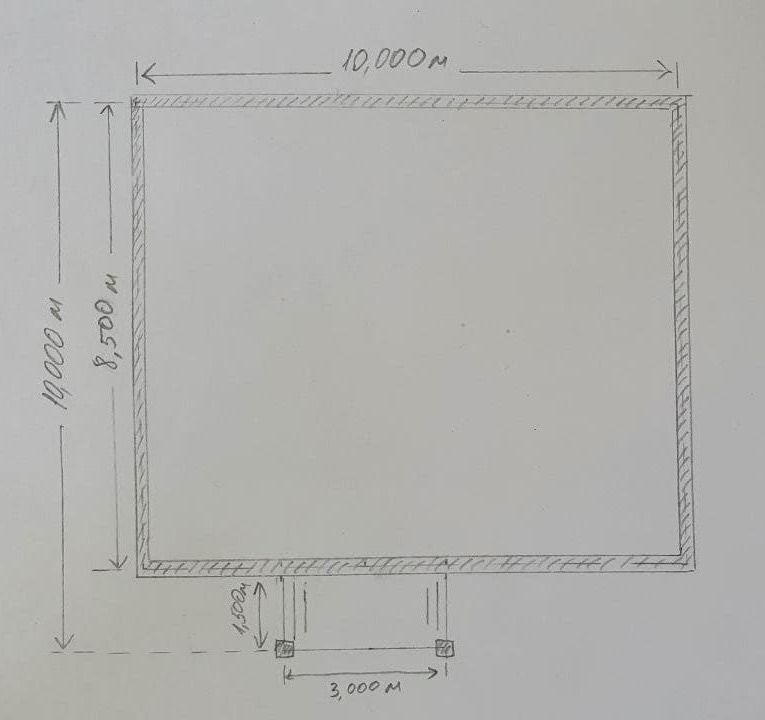
Now that the sketches are ready, we will draw an exact drawing of the house. Choose a scale of 1:100 or 1:50. That is, 1 cm is equal to 1 meter or 1 cm is equal to 0.5 m. Draw the outline of the walls. With an indentation in both directions by the thickness of the walls, draw the lines parallel to the first. Shade the perimeter of the walls.
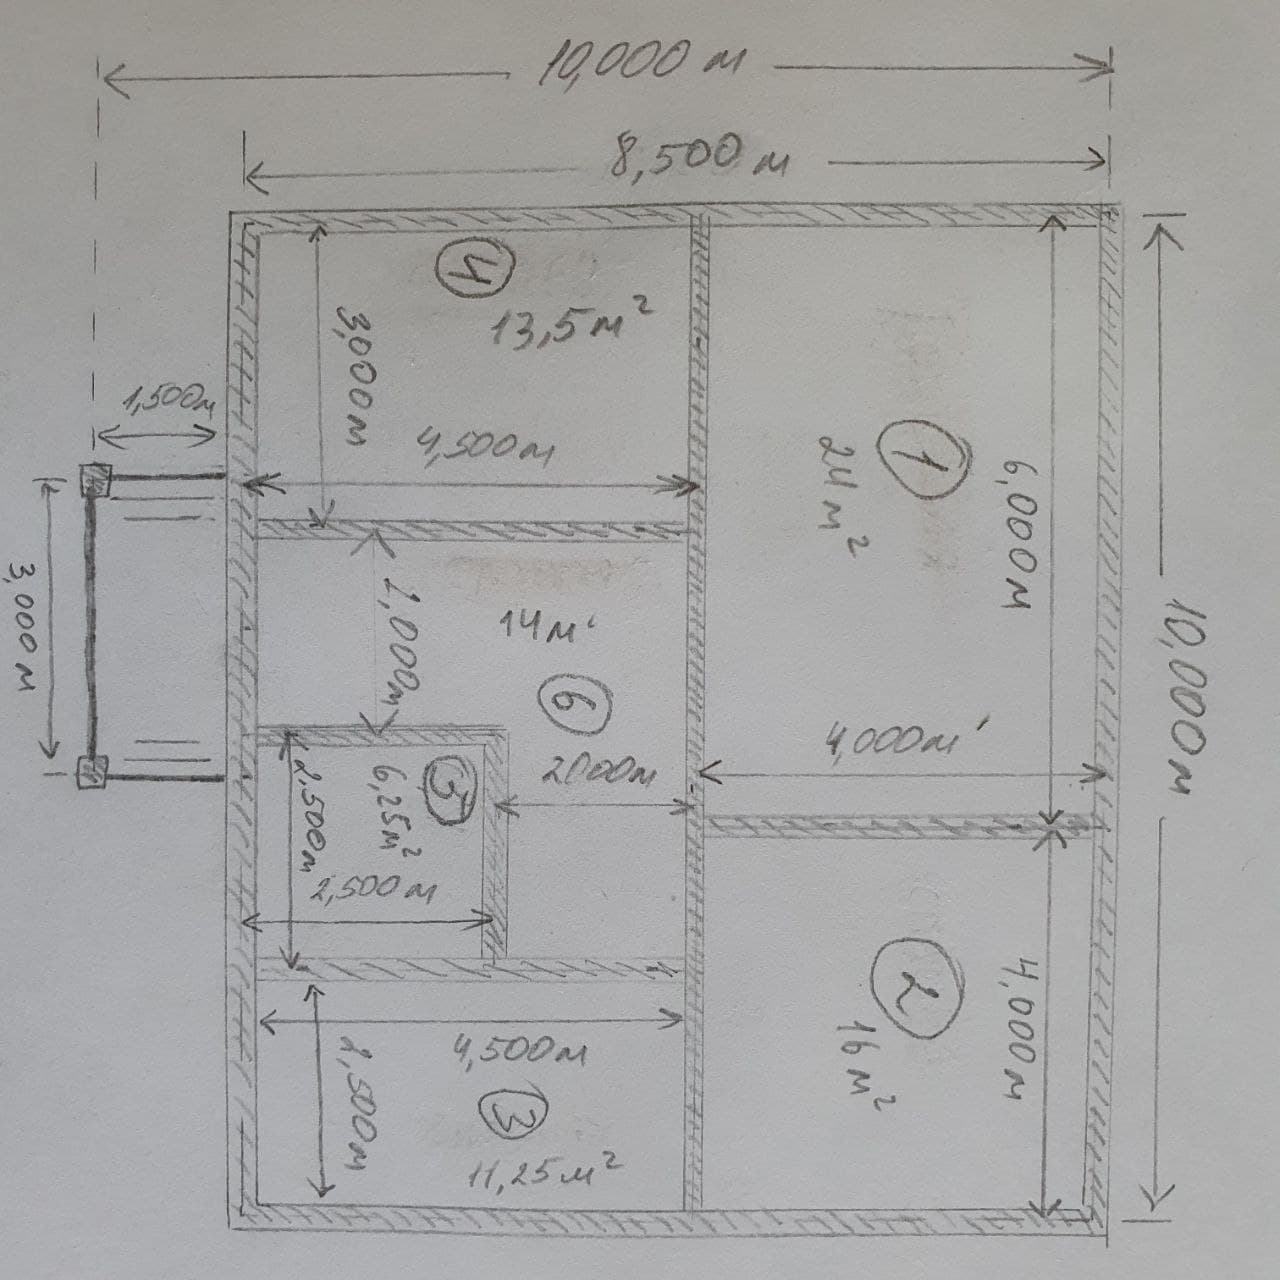
Now proceed to drawing the interior walls according to your plan. The drawing should contain all the dimensions of the walls, the area and the names of the rooms.
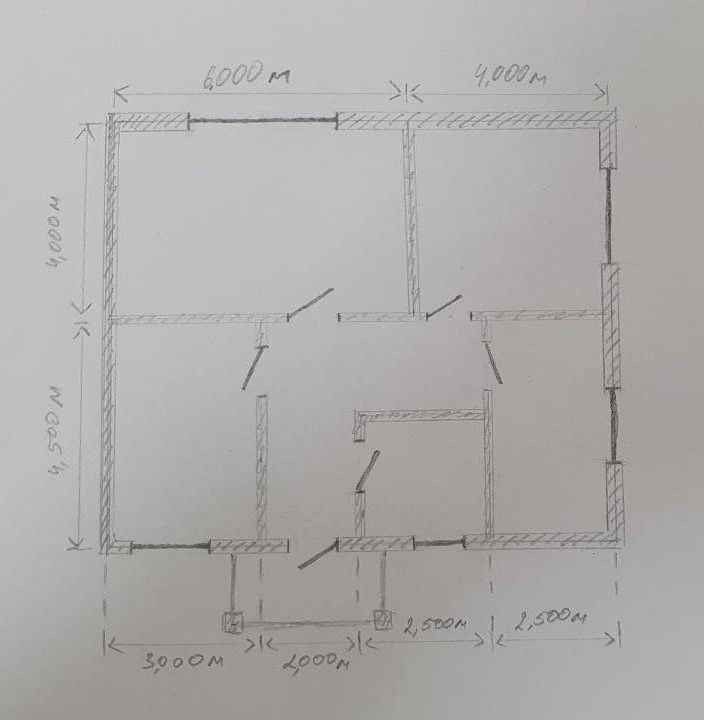
After that, you need to specify the location of the doors and windows.
Now you can specify the location of the furniture in the room.

Our house project is ready. The drawing turned out to be a small house of a simple design that allows you to minimize the costs of its construction. There is nothing superfluous in the layout and there is everything you need for a comfortable life. There is a covered porch protecting from rain. A small hallway separating the common and private areas. On the left there is a living room and a kitchen, and on the right there are two bedrooms.
Used media files:
<a href=’https://ru.freepik.com/photos/house’>House фото создан(а) kjpargeter – ru.freepik.com</a>