
1 week
Project Goals
– Make, study and compare different designs of pinwheels;
– Explore the movements of different types of turbines.
Teacher’s Guide
– Divide students into groups;
– Make a brief overview of the theoretical part;
– Then proceed to the practical part;
– Pupils have to make 3 kinds of pinwheels and test them in the wind and compare them and draw conclusions.
Safety in Steam Lessons
Before starting a lesson, the teacher is advised to familiarize himself with the safety precautions. If necessary (in the case of using the items specified in the TB), conduct a brief briefing for students. Follow this link Safety in Steam Lessons
Theoretical part
Wind turbines convert wind energy into mechanical or electrical energy. One type of wind turbine, the windmill, has been used around the world for thousands of years to convert wind energy into mechanical energy for tasks such as grinding grain and moving water. Recently, wind farms have become increasingly popular, using wind turbines to convert wind energy into electrical energy.


Photo by Pixabay: https://www.pexels.com/photo/alternative-energy-blade-blue-clouds-414928/
Photo by Tabitha Mort: https://www.pexels.com/photo/red-white-and-blue-windmill-685778/
In general, all wind turbines have the same basic components: blades connected to a shaft, both of which are turned by the wind hitting the blades. To make wind power as efficiently as possible, engineers have experimented with many different wind turbine designs. For example, wind turbines can rotate on a horizontal or vertical axis, have large or small blades, and in some cases, they can even be bladeless!
Wind turbine design changes depending on where the turbine will be located and how environmental factors affect its performance. However, the goal is always to maximize the amount of energy extracted from the wind. In this lesson, you’ll study one of these factors—blade shape—to determine how they affect the efficiency of your spinner.
Practical part
Step 1. Prepare the necessary materials.

Step 2. Cut out two 15 x 15 cm squares of paper from two sheets of paper. Place one square on top of the other and line up all the edges, then glue the two pieces together to form one 15 x 15 square. Tip: Use two different colors of paper to make a pretty pinwheel.

Step 3. Fold the two-layer square in half diagonally and make a crease. Open it up and fold it diagonally again, this time in the opposite direction. Make a crease, then unfold the paper back into a square.

Step 4 Use scissors to cut each corner along the diagonal crease, stopping 2-3cm from the center. You should now have a square with 4 “wings” or “petals”.
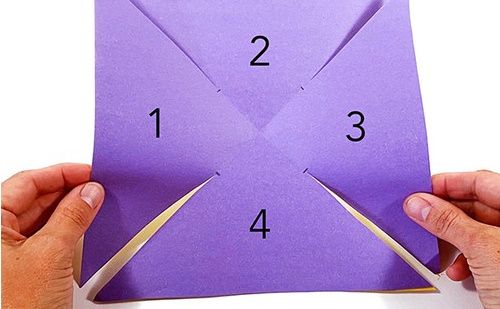
Step 5 Starting with the topmost petal, carefully fold the right corner of the petal and hold it in the center of the square. Try not to wrinkle the paper. Repeat this with each remaining petal, holding each corner in place in the center with your hand.

Step 6. Once all 4 petals are folded at one corner towards the center, secure them in place with duct tape. With the help of your teacher, push the button through the tape in the center of the pinwheel.

Step 7 Use the button to attach the pinwheel to the pencil eraser. Make sure the pinwheel is secure but still able to turn with the button.

Pinwheel 2 design
Step 1 Use another piece of paper to cut out eight 10 x 5 cm strips of paper. For each pair of strips, lay one strip on top of the other and line up all the edges, then glue the two strips together. When you are done, you should have four 10 x 5 cm strips.

Step 2 Get your four, 10 x 5 strips of construction paper. Fold each strip along the center, then open it again so that the paper forms a “V”.

Step 3 Arrange the four folded strips as shown in the image below. Each paper strip represents one turbine blade.

Step 4. Glue all the strips together in the middle where they join. Add tape on both sides, front and back. With the help of an adult, push the button through the tape in the center of the pinwheel.

Step 5 Use the button to attach this second pinwheel to the pencil eraser. Make sure the pinwheel is secure but still able to turn with the button.

Pinwheel 3 design
Step 1 Use another piece of paper to cut out eight triangles, each 7 cm base and 10 cm high. For each pair of triangles, place one triangle on top of the other and line up all the edges, then glue the two triangles together. When you are done you should have four triangles, each 10 cm high with a 7 cm base.

Step 2. Fold each of the four triangles in the center from its top to the right corner, and then open them again so that each sheet of paper is in the shape of the letter “V”.

Step 3. Lay out the triangles on the table so that they point in four different directions and meet at their vertices (tips). Then tie all the triangles together in the middle where their vertices meet. Add tape on both sides, front and back.

Step 4. With the help of an adult, push the button through the ribbon in the center of the spinner.
Step 5 Use the button to attach the pinwheel to the pencil eraser. Make sure the pinwheel is secure but still able to turn with the button.

Observations and results
In this project, you designed and tested 3 different models of gears. Each design you tested had different blade shapes.
You should have found that the first folded-blade spinner rotated the fastest and smoothest when placed in front of a fan or the wind. The triangle and rectangle-shaped blades probably didn’t spin as fast or as efficiently as the first one you tested.
The difference in performance for each spinner was due to the different blade shapes you tested. The design of the blades of the first spinner allowed each blade to capture the largest amount of air as it rotated. To understand why this made him move faster, imagine a swimmer rushing through the water. With each stroke, a good swimmer will keep their hand closed and cupped slightly to try to get as much water into their hand as possible. This allows the swimmer to “push off” more water and move forward. You can imagine that if they spread their fingers and let the water flow, they wouldn’t be able to push through the water so quickly. Your first pinwheel design is based on the same principles.
Conclusion
Since it is folded, it acts as an air collection pocket. The more air it can collect, the more efficiently it will move along the rod. The other two designs of spinners did not collect air in the same way, so they did not move as quickly or smoothly as the first design.
Now that you know the basics of spinner blade design, try experimenting on your own to make the most efficient spinner you can!
On this project, each student is awarded the STEAM title, in two categories:
– You made a model of a wind generator, you are a real process engineer!
– You not only made different versions of the work but also experimented, compared, and drew conclusions. Congratulations, you are a young scientific design engineer!
Evaluation
PBL grading criterion:
Project-based learning is a learning method in which students acquire knowledge and skills by working on a single project to explore and answer a genuine, interesting, and complex question, problem, or challenge.

